
M Gopalakrishnan
I always wondered how I could get the children to spend more time thinking and analyzing a given problem, rather than taking a pen and solving it straight away. I have also wondered how I could make them experience the same joy I experience when I solve a problem. This led to the following exercise with class 8 students. While teaching each chapter, instead of explaining every concept/problem, I tried posing a few problems as challenges to the children and seeing how they responded. The exercise unfolded as given below:
Equilateral triangle
After teaching them the area and perimeter of square and rectangle, I started on the area and perimeter of triangles. I introduced the regular formula ½ x base x height and the ‘heron’s formula’
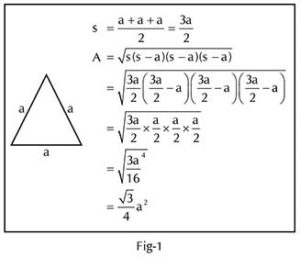
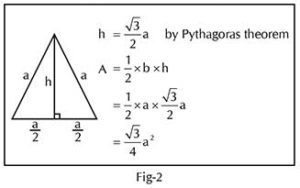
 for finding the area of a triangle. Towards the end of the class I threw a challenge to the children. I gave them the formula for the area of an equilateral triangle and asked whether any of them could derive that formula. After a few minutes, Vandana (all names have been changed) thought of substituting ‘a’ for a, b, c in the ‘heron’s formula and derived the formula as explained in Fig-1. Riddhi got the idea of using the Pythagoras theorem to find the height of the triangle. Together with Arun, she derived the formula using the Pythagoras theorem as shown in Fig-2.
Rhombus
Next, I asked them whether they could derive the formula for the area of a rhombus. Though, five of them took up this challenge, only one was able to solve it. Riddhi divided the rhombus into four right triangles, applied the Pythagoras theorem and derived the formula as shown in Fig-3.

Rectangle and parallelogram
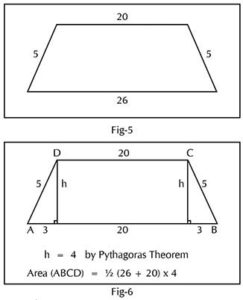
Later when we were learning the area of a parallelogram, I asked them to prove that the parallelogram and rectangle drawn on the same base and between the same parallel lines will have the same area. Five children took up the challenge and worked. But only Riddhi persisted. After a few trials, she got the idea of breaking the diagram into a trapezium and two right triangles and proved it as shown in Fig-4.
Isosceles trapezium
Another day, after discussing the area and perimeter of a parallelogram and trapezium, I gave them all the four sides of an isosceles trapezium (Fig-5) and asked them to find the area. They came up with the idea of dividing it into a rectangle and two right triangles of same bases, finding the height using the Pythagoras theorem and then finding the area as shown in Fig-6. Then I asked them to prove how the two right triangles have equal bases. Arun solved it using the right angle-hypotenuse-side congruency axiom.
Trapezium
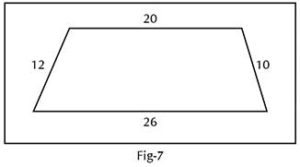
Next, I gave them the challenge of finding the area of a normal trapezium where the oblique sides are unequal and only the lengths of all four sides are given (Fig-7). The excitement of some children rubbed off on many others to take up the challenge.
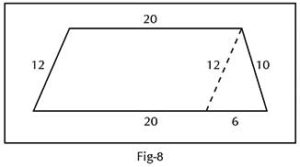
To reduce the noise level, I asked one group to go out of the class and work. Arun, Riddhi, Harsh and Vandana went out to work. After many trials, one of them drew a line and divided the trapezium into two parts. But it took some time for them to realize that by drawing that line they had divided the trapezium into a parallelogram and triangle as shown in Fig-8. Next one of them suggested that they find the area of the triangle using the heron’s formula. Then another suggested that they find the height of the triangle using ½ x base x height. Finally, this led them to the area of the trapezium using the ½(a+b) x h formula.
In the meantime, Suresh came up with two ideas. First he thought of dividing the trapezium into three triangles (Fig-9) and the second idea was attaching an inverted trapezium (Fig-10). Though he was unable to solve the problem, I was happy to find him thinking out of the box. He excused himself to go to the restroom, but even before he could step out of the class, he came back to share more ideas. The next day he said he had discovered something. While I expected him to say something about the challenge, he surprised me by saying, “The brain works faster when there is an urgency to go to the restroom.” The whole class burst into laughter at his hilarious remark. I couldn’t control my laughter either.

Cube and cuboid
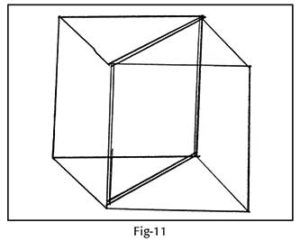
Then we started volume and surface area of a cube and cuboid. Towards the end of the class, I asked them to find the formulae for the lengths of the diagonal of a cube and cuboid. Arun and Harsh worked together and found the diagonal of a cube. Arun drew a neat diagram, explained that if we cut a cube along the diagonal, each half will end up with a rectangular face and then we would need to find the diagonal of this rectangle using the Pythagoras theorem as shown in Fig-11. It was amazing to see the way in which they were able to visualize. Then Vandana and Arun worked together and found the diagonal of a cuboid. This time there was a clear increase in the number of children (from 3 to 10) who attempted the challenge.
Geometric constructions
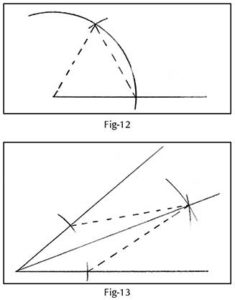
While learning geometric constructions, I asked my students the basis for a few constructions. While constructing a 60º angle, Sridhar remarked, without me prompting him, ‘We are constructing an equilateral triangle’ (Fig-12). Later, when we were bisecting an angle, the children remarked that it looked like a kite, and the bisector divided the kite into two congruent triangles and hence the angles were equal (Fig-13). After this, I asked them to think of how to construct 30º, 75º and 105º angles.
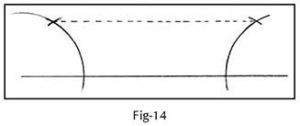
The following day, I asked them how a line parallel to a given line at a given distance is constructed. Arun came up with the idea of two 60º angles at the two ends of the given line and joining the two 60º points to get a parallel line (Fig-14). Then he realized that though the line was parallel to the given line, it was not at the distance specified. Amalan came up with the idea of constructing two perpendicular lines at the two ends, marking the distance and then joining the two points.
After teaching them how to construct an equilateral triangle of a given side, I asked them to construct an equilateral triangle of a given altitude. Riddhi and Parvathi worked on it for the next two days. Usually the children persisted with a problem for about half an hour, this was the first time that these two girls had wrestled with it for two days.
Conclusion
This exercise stimulated the children and made them think in various ways. It is worth noting that though some of these solutions are given in their textbooks, these children didn’t refer to their books; they worked on their own and discovered the solutions by themselves. I could see the joy on their faces when they found out on their own. The brighter ones were motivated because I labelled it a challenge. Their enthusiasm motivated those who usually didn’t attempt any challenges. One of the weaker students even came and said, “Bhaiya , please give me a challenge which I can solve!” Now, in every class I get an enthusiastic, “What is the next challenge, bhaiya?” Overall, it developed an interest and liking for math in most children.
Suggested pedagogy
Step-1: Explain a simple problem or concept.
Step-2: Pose a problem/concept of a higher level of difficulty as a challenge.
Step-3: Wait for students to solve.
Step-4: Let the students/teacher explain it to the whole class.
Step-5: Pose a problem/concept of an even higher level of difficulty as a challenge.
Repeat the above process until a chapter is completed. Then move on to the next chapter and repeat the whole cycle.
This was a revelation to me.
The author became a teacher after working as an engineer for 17 years. He has been in the field of education for 18 years now and is currently teaching math to classes 8 and 10 at Peepal Grove School, Chittoor, Andhra Pradesh. He can be reached at truthalonefrees@gmail.com.